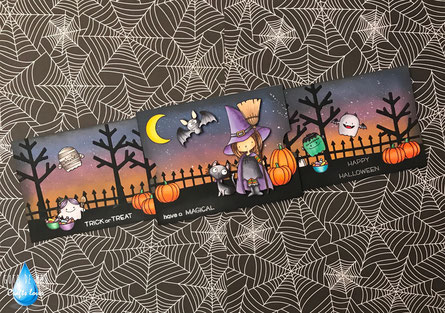
Halloween is about to come and I always love to make a special card for this holiday. For this occasion, I've created a surprising double sliding card which includes three cute scenes with a shinny sentiment on each panel.
To make my card, I used three pieces of cardstock measuring as follows:
· CENTRAL PANEL: 8.75" x 11", scoria at 4.25 and then at 8.5, leaving a 0.25 flap that will lock the whole system.
· INNER PANELS: 3.875" x 5.5" (3-7/8 x 5-1/2).
· MECHANISM: 4.1875" x 5.375" (4-3/16 x 5-3/8), scoring at 0.25" and 4.125" (1/4 and 4-1/8) and 0.24" inwards, so that we end with 4 small flaps that will contain our sliding mechanism in place.
To start with, I added double-sided tape from flap to flap along the larger side of the panel, both up and bottom and on the front and back sides. Next, I cut a long band of blasting bag and added double-sided tape to one of its ends, I bent the other end over the adhesive in such a way that it was neither too loose nor too tense so that it could slide easily. Then, I added a strip of double-sided tape to the left end of the plastic band on the front and another one on the opposite end of the back side.
Next, I used distress oxide inks for my background on the three panels (inner ones and central) so that I was a kind of continuous background. Later, I got my stamps ready using Simon Says Stamp Intense Black Ink, colored them with my comic markers and then I fussy cut them so that no white border was left using the coordinating dies.
Once all my elements were ready, I adhered them on the panels using Nuvo Deluxe Adhesive as well as some foam mounting tape by 3M Scotch. Next, I stamped my sentiments on the panels using Versamark Ink and added Metallic Silver embossing powder by WOW! and heat set them.
To assemble the whole mechanism, I peeled off the release paper from all the strips of double-sided tape and first, I glued the two inner panels, on the front and back of the mechanism panel, both facing up, and then, I adhered the mechanism panel to the central panel, closing everything with the flap.
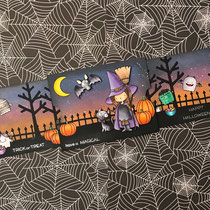
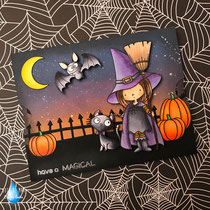
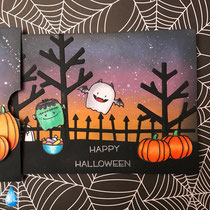
Here you have some close-ups of the card; click on them to make them bigger!
But if you want to follow my step-by-step YouTube tutorial, just click here or watch it down below. I hope you find the video inspiring and easy to follow. DOn't forget to subscribe to my channel and if you like the tutorial, give me a thumbs up! Thanks for reading, watching and following. See you soon!